
Market Thesis:
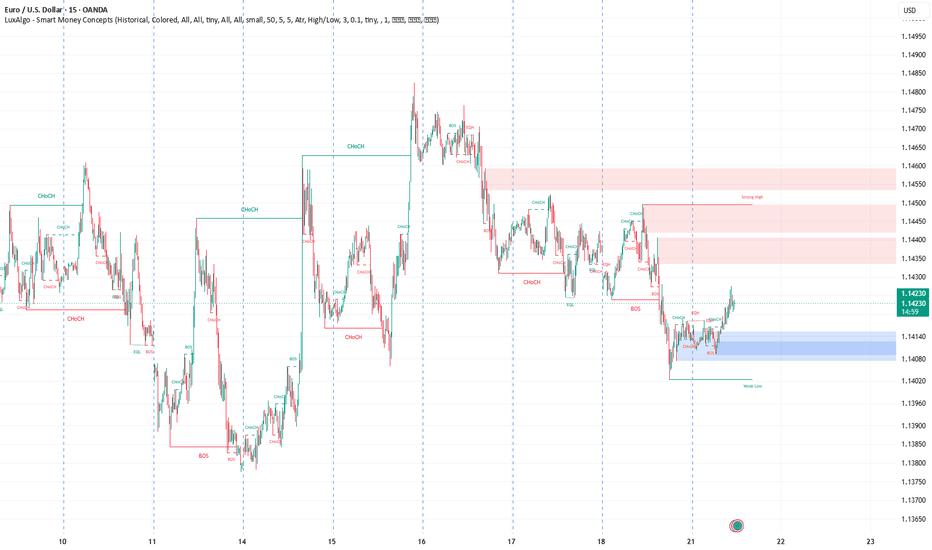
EUR/USD is rebounding from the visible 15-minute demand zone after a bearish BOS drove price toward the marked weak low. Near-term order flow has turned constructive, but the broader intraday structure remains capped beneath layered supply at 1.14340–1.14405 and 1.14535–1.14595.
The current recovery is therefore a retracement unless buyers secure a confirmed structural break above nearby supply.
Visible Confluences — 15-Minute Chart
Current price is approximately 1.14231.
Recent bearish BOS delivered price into the lower liquidity area.
Visible demand zone: 1.14075–1.14135.
Marked Weak Low: approximately 1.14020, leaving downside liquidity vulnerable.
Price produced several internal CHoCH signals while consolidating above demand.
Local equal-high liquidity is visible around 1.14185–1.14200 and is being challenged.
First visible supply zone: 1.14340–1.14405.
Marked Strong High: approximately 1.14490.
Upper supply zone: 1.14535–1.14595.
The latest bullish reaction has not yet invalidated the preceding bearish 15-minute BOS.
Trade Scenarios
Setup 1 — Buy the Demand Retest
Direction: Buy
Entry zone: 1.14085–1.14125
Trigger: Lower-timeframe bullish CHoCH, rejection wick, or decisive bullish momentum candle from the blue demand zone
Stop loss: 1.14005
TP1: 1.14230
TP2: 1.14345
TP3: 1.14485
Rationale: The demand zone has already generated a meaningful reaction. A controlled retracement followed by renewed bullish structure would provide a cleaner continuation entry than chasing current price.
Setup 2 — Sell the First Supply Reaction
Direction: Sell
Entry zone: 1.14345–1.14400
Trigger: Lower-timeframe bearish CHoCH, failed breakout, or strong bearish displacement from the visible supply zone
Stop loss: 1.14455
TP1: 1.14230
TP2: 1.14135
TP3: 1.14020
Rationale: This zone aligns with the origin of the latest bearish expansion. Until price closes decisively above it, the rally can still be treated as a retracement into supply.
Setup 3 — Bullish Breakout Continuation
Direction: Buy
Entry zone: 1.14385–1.14410 on a confirmed breakout and retest
Trigger: A 15-minute close above 1.14405, followed by an LTF bullish CHoCH or momentum continuation
Stop loss: 1.14320
TP1: 1.14490
TP2: 1.14545
TP3: 1.14590
Rationale: Acceptance above the first supply zone would weaken the immediate bearish thesis and expose the marked strong high and upper supply.
Refinement Tip
For the best risk-to-reward, monitor these 15-minute zones on the 1-minute, 3-minute, or 5-minute chart. Execute only after clear candle confirmation, displacement, or an LTF structural shift; avoid entering solely because price touches a zone.
⚠️ Disclaimer: Trading financial markets involves significant risk, and no market outcome is guaranteed. This analysis reflects visible structure and probability at the time of the chart and is provided strictly for educational and analytical purposes. Apply independent judgment, predefined risk limits, and disciplined position sizing.
風險提示:本文所述僅代表作者個人觀點,不代表 Followme 的官方立場。Followme 不對內容的準確性、完整性或可靠性作出任何保證,對於基於該內容所採取的任何行為,不承擔任何責任,除非另有書面明確說明。
 暫無留言。 來發表第一則觀點吧。