
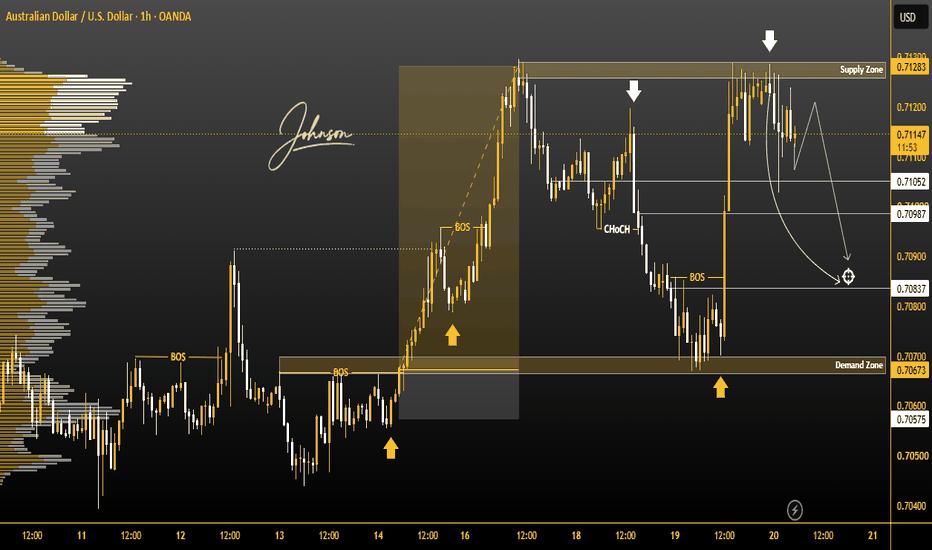
AUDUSD AUDUSD is currently trading in an important area where both the Demand Zone and Supply Zone are showing strong market reaction. This suggests that price may continue to respect these zones and move between them until a clear breakout or breakdown occurs.
On the 1H timeframe, traders should carefully monitor price action around these key zones. A strong rejection from the Demand Zone could support a bullish reaction, while rejection from the Supply Zone may create selling pressure.
🎯 Potential Downside Targets
Target 1: 0.71000
Target 2: 0.70900
Target 3: 0.70800
These targets can become active if bearish momentum develops and price continues moving lower from the current zone.
Market Structure
Pair: AUDUSD
Timeframe: 1H
Key Areas: Strong Demand & Supply Zones
Market Condition: Range / Zone Reaction
Targets: 0.71000 → 0.70900 → 0.70800
⚠️ Trade Confirmation
Do not rely on the zone alone. Wait for 1H price action confirmation, rejection, or a clear structural shift before taking a position. A sudden breakout can invalidate the current zone-to-zone setup.
風險提示:本文所述僅代表作者個人觀點,不代表 Followme 的官方立場。Followme 不對內容的準確性、完整性或可靠性作出任何保證,對於基於該內容所採取的任何行為,不承擔任何責任,除非另有書面明確說明。
 暫無留言。 來發表第一則觀點吧。